Tuesday, March 27, 2012

Sketti!

Spaghetti is a great and easy food to make quickly and it stores pretty well for about 7days in the fridge!  It's coming to that time at the end of the month where I start to run out of food since I only go shopping once a month to save money.  Oddly enough though this is when I'm at my creative peak for recipes, now you'd think that wouldn't make sense seeing as I have more to work with at the beginning of each shopping period but it actually works out great.  You see, the less I have the more creative and thoughtful I have to be about what I'm going to make.  Sometimes I have everything but the kitchen sink in my pot!

Coming up with new cooking ideas can be a challenge especially when working on a budget.  Unlike most people I can't go out every week for groceries because that would be way too costly so I shop once a month and get everything I need.  On occasion I'll go out to get a fresh veggie or two but generally I never need to.  Being on my last week of my food supply is actually how I came up with a grilled cheese tuna sandwich and I'm not really sure what compelled me to try this strange combination but it worked out really well.

So here's a recipe for a easy garden fresh spaghetti that I got from allrecipes.com  everything used are common ingredients that most if not all of you should have on hand!

Ingredients:

  • 1/2 cup sliced fresh mushrooms
  • 2 medium carrots, coarsely chopped
  • 2  chopped celery stalks 
  • 2 tablespoons chopped onion
  • 1 tablespoon chopped green pepper (bell pepper)
  • 1 tablespoon  chopped sweet red pepper (bell pepper)
  • 1 garlic clove, minced
  • 1-1/2 teaspoons vegetable oil
  • 1/4 (28 ounce) can crushed tomatoes
  • 1/4 (15 ounce) can tomato sauce
  • 1/8 (12 ounce) can tomato paste
  • 2 tablespoons and 1/2 teaspoon beef broth
  • 1/4 teaspoon dried basil
  • 1/4 teaspoon dried oregano
  • 1/4 teaspoon brown sugar
  • 1/8 teaspoon salt
  • 1/8 teaspoon pepper
  • 2 tablespoons and 1/2 teaspoon grated Parmesan cheese
  • Hot cooked spaghetti (make this last)
Directions:
In a Dutch oven, saute the mushrooms, carrots, celery, onion, peppers and garlic in oil until tender. Add the next 10 ingredients. Bring to a boil. Reduce heat; cover and simmer for 1 hour. Serve over spaghetti.


Notes:
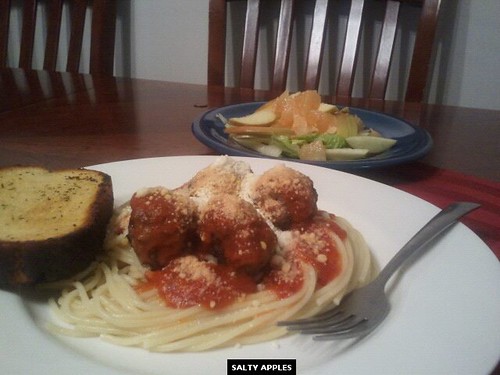
The spaghetti I made was A LOT simpler, it was about 10pm mind you and I was feeling lazy LOL. So I just hand rolled some meatballs and made a small fruit salad to go with it. Enjoy your food!
image_1

Saturday, March 24, 2012

Jazzed up Ramen

Ramen has pretty much become a staple food in every college kids pantry and for good reason. It's cheap, easy to make, and very easy to jazz up with a couple of common ingredients found in everyone's house.  By simply adding one or two more things to your Ramen you can have a much more filling and tasty meal ready in about 5 minutes!

A single packet of plain Ramen supposedly feeds two people according to the package but I call bs on that one.  I can easily eat a pack on my own and not be full afterwards. But if you are on a budget and trying to feed yourself and your room mate don't worry!  This simple Ramen with a few added things can easily feed both of you.

Here's what you'll need:

1 packet of Ramen (your choice of flavor)
1 small or medium chicken breast
1 large carrot
1 medium head of broccoli
1 celery stalk
2tbs of lemon juice
salt & pepper to taste
McCormick chicken spice
1tbs of olive oil

Make it!
Start out by chopping up the chicken breast into bite sized pieces then season with salt, pepper, chicken seasoning, and 1 tbs of lemon juice.  Wash and peel your carrot and wash the celery.  Cut on a diagonal angle.  Wash and cut your broccoli into bite sized pieces.  Season all the veggies with salt and pepper.  Don't be afraid to over-season your food this time as it'll help flavor the Ramen when combined.
Throw it all in a pan over high heat with the olive oil and cook until the veggies are fork tender, about 5min.  Meanwhile cook your Ramen either on the stove or in the microwave this also takes about 5min.
Once everything is done combine everything together and serve!

Notes:
Don't be afraid to experiment!!!!!  This can be made so many different ways to adjust it to your tastes!  Try adding scrambled eggs,cheese,eggplant,peas and anything else you can think of.  Ramen is a very versatile meal so do what you feel is right!

image_1

Thursday, March 22, 2012

Vodka infused pomegranate-berry iced tea

Summer is upon us and that means it's time to break out the iced tea!  I love a good iced tea and I'm not talking about that Lipton crap, this pomegranate-berry iced tea is straight from the Mighty Leaf Tea company and it's simply amazing.  From the moment I open my tin of tea my nose is filled with the wonderful scent of pomegranates and various berries with a slight hint of citrus.

This iced tea can also be made into a slushie or margarita of sorts simply by putting it in the blender with some ice and liquor of your choice.  This drink is very refreshing, easy to make, and can be made in big batches.

Ingredients: Yields 1gallon of tea
1 one oz pomegranate tea bag
2-3 cups of ice (depends on your pitcher size)
vodka
sugar for rimming the glasses
blueberries and raspberries for garnish
mint for garnish
a few thin lemon slices

Directions:
Heat filtered or bottled water to a rolling boil or to 205 degrees F. Add tea bag to a 1-gallon pitcher or container.  Fill pitcher halfway with boiling water. For best flavor infuse for 5minutes but no longer than that or tea will be bitter.  Remove the tea bag and discard.  Add ice so that the level of the liquid rises to the top of the pitcher. Shake to flash chill or store in the refrigerator for an hour.

Meanwhile, coat the edge of your glasses in sugar simply by getting the edge wet and then rolling and pressing it into the sugar. Add 1-1/2oz of vodka (or more if you're feeling adventurous), a bit of ice and iced tea to a martini shaker.  Shake well. Be careful as it will get foamy!  Pour into glasses until full. Add a thin slice of lemon to the edge of the glass.  Skewer a few blueberries and raspberries on a long toothpick alternating berries and set into the tea. Add a sprig of mint if desired and enjoy!

Notes:
This drink can be made kid friendly simply by substituting the vodka for sparkling water or 7up.

Experiment!! Try out different types of liquor  and tea with this, it might turn out great but you never know until you try!!

image_1

Tuesday, March 20, 2012

Tea brewing

Sorry I've been gone so long, I've been super busy lately!  Today I'll be talking about how to properly brew tea.  All teas have their special way of being steeped whether its green,black,white,herbal,iced, or oolong knowing how long to steep your tea can really make a difference in the taste.

Water quality
The first step in brewing tea is of course water!  The quality of the water that you choose to use is very important as this impacts the taste of the tea.  Try to use purified water or spring water.  Tap water and bottled waters aren't usually used since they still have minerals and impurities in them and can greatly alter the taste of teas.  Never use hot tap water to speed up the brewing process because the water heater in your home adds even more impurities into it.

Picking your tea
Choosing good tea can be a challenge sometimes since there are so many out there to pick from.  Your local grocery store may carry 20+ different kinds of tea which is great if you want cheap artificially flavored tea.  Health food stores will sometimes sell gourmet and organic teas but will often have less of a selection than that of a grocery store.  A tea house would be your best bet for tasting and buying gourmet teas.  While the latter option may cost more it's worth it for great quality tea.

How much tea to use
When buying loose leaf tea (tea that's not in a bag) you'll want to use about 1-2tsp per 8oz glass and adding more tea until the desired briskness and body is achieved.  If using a bag of tea you'll only need one bag per 8oz glass.

Heating up your water
Water temperature is just as important as picking out your desired tea. Heat your water in a glass, ceramic or clay teapot until it reaches a boil (212 degrees Fahrenheit) then allow the water to cool before brewing your tea. As a general rule green tea should always be heated to 180 degrees Fahrenheit, 190 degrees for Oolong tea, and 200 degrees for black tea.

Brewing methods
Brewing loose leaf tea in a teapot:  This method of brewing allows for maximum freedom for the leaves to unfurl.  This makes for a stronger, more flavorful cup.  The disadvantages are removing the leaves and cleaning the teapot after brewing. If the leaves are allowed to sit in the water for a long period of time the tea can become bitter.

The tea ball: Most tea balls are made from aluminum or stainless steel to hold the tea in place.  This allows for easier cleanup of the leaves.  However there is usually insufficient space for the tea leaves to expand.

Coffee pot:  Brewing your tea in a coffee pot is a fast and easy way to get a lot of tea at once.  A disadvantage to this is that most coffee makers won't heat water hot enough for Oolong or fine green teas to produce the best taste.

Steeping tea:
After gauging the proper water temperature, the tea leaves are steeped in the water using one of the methods listed above.  Steeping tea leaves should be allowed to set still during this process because excess motion can cause the release of more tannins which can lead to bitter tasting tea.  Do not steep tea for to long before serving when brewing in a teapot.  Many newer teapots have basket filters that can be removed after the tea has steeped for the recommended time.  Start with 1-3 minutes and gradually increase the time to your preferred likeness.  This is especially important when preparing delicate green teas. 


Enjoy your perfect tea!
image_1

Monday, March 12, 2012

Wiiiingz

There's nothing better than a plate full of chicken wings.  Today it seems like every restaurant on the planet has some kind of chicken wing on their menu, and with a billion different flavors out there it can be hard to choose a favorite.  There's no doubt that home made is always going to be the best but my favorite wings are the Kentucky derby bleu cheese wings at Velocity 5 in Arlington VA.

This recipe is a simple dry rub that can be altered in so many different ways ( I added chili flakes to mine.) So get those wet-naps ready cuz these wings will rock your socks!

Here's what you'll need
Makes enough rub for about 20 wings
Ingredients:
3 TBS dark brown sugar
3 TBS salt
1 TBS freshly ground black pepper; coarsely ground
1 TBS paprika
1 tsp. garlic powder
1/2 tsp. dry mustard
A bit of olive oil to brush on the wings

Directions:
1. Preheat oven to 375 degrees.  Combine all of the dry ingredients in a bowl and mix well.  Cut the tips off of your wings if they came with them.  Remove any extra feathers that may still be on the chicken.
2.  Brush on a bit of olive oil on to each wing coating the entire thing.  Sprinkle the dry rub onto the wings and don't be shy with it!
3. Place on a baking sheet lined with tinfoil and pop those babies into the oven for 45 min or until the skin is nice and crispy golden brown.
4. Put them in your mouth and enjoy!

image_1

Saturday, March 10, 2012

God like brownies

These are hands down the best brownies I have ever tasted in my life!  I got this recipe from The Londoner and they aren't kidding when they say "Best brownies in the WORLD."

They're very easy to make, needing only three common ingredients that most if not all households have on hand. You can opt for the easy way by using boxed mixes or if you're feeling really adventurous make your own!  I will talk no more and let you bake these heavenly treats.

Ingredients:
1 Box of oreos
1 Box of fudge brownie mix
1 Box of chocolate chip cookie mix

Directions:
 Preheat oven to 350 degrees. Line a baking tray with parchment paper.
Follow the instructions on the cookie mix box & stir until you have gooey cookie dough, add a little extra water and oil to what they suggest, it just keeps it moist as you'll be baking it for longer than suggested. An extra teaspoon of each is just right.

Mix up your brownie mix as the directions say on the box.

Press the cookie dough into your paper lined pan until the bottom is covered.  Next place a layer of oreos on top.  Lastly pour the brownie mix on top and even it out.

Bake for about 30mins.  Bake time may vary depending on your oven but it shouldn't take less than 30 mins for these babys to cook.

When done let cool for about 5min then remove from pan using the paper to lift it out onto a cutting surface.  Cut yourself a big chunk, piece, slab, whatever you feel you can eat at the moment! Get a big glass of milk too and enjoy!
(Recipe credit goes to The Londoner)

image_1

Friday, March 9, 2012

Japanese cucumber salad

I L-O-V-E Japanese food!  It's always flavorful, super colorful, and good for you.  Today I decided to start out with a Japanese style cucumber salad with seaweed wrapped shrimp.  This dish makes a great light lunch or a perfect afternoon snack.  It's easy and quick to make, and many of us already have the ingredients to make it.

The one item that you may not have is the seaweed or nori as it's usually called in supermarkets.  Nori comes in a package of 6-10 sheets and can be found in the Asian food section of your local super market.  Anyone that eats sushi is familiar with this green food that is wrapped around their rice and can tell you that it tastes great!

When using nori you must make sure that your work surface is dry and clean, water will make your nori very soggy and hard to work with if you need to cut it.

Here's what you'll need to get started:
Ingredients:
2-3 sheets of nori
1 large English cucumber
1/4c rice vinegar
1tsp. sugar
1/4tsp. salt
2 Tbs sesame seeds, toasted (see details below*)
10 small shrimp or 5 extra large shrimp (uncooked)

Instructions:
1. Wash and peel your cucumber to leave alternating green stripes.  Slice the cucumber in half lengthwise.  Using a sharp knife or mandolin, cut into thin slices.  Place in a double layer of paper towel and press down gently to remove excess water.
2*.To toast the sesame seeds, heat a small dry skillet over low heat.  Add seeds and stir constantly until golden and fragrant, about 2min. Transfer to a small bowl and let cool.
3. Combine vinegar, sugar and salt in a medium non reactive bowl, stirring to dissolve. Tear pieces of the nori off and add to the liquid mixture. Add the cucumbers and sesame seeds; toss well to combine.  Store in refrigerator until ready to serve.
4. Bring a small pot of water to a low boil.  Very carefully slice the nori into strips wide enough to wrap your shrimp in. Meanwhile start cooking your shrimp in the small skillet until it reaches a nice pink color.  Set aside when done.  Dip each strip of nori one by one into the boiling water until it softens, about 5sec then very carefully take it out with a fork and place on a plate allowing part of the edge  to hang off so you can pick it up.
5. Carefully wrap your shrimp in the nori going around the curved edge of the shrimp.  Don't worry if you tear the nori it'll adhere to its self if you stick another piece on.
6. Plate your cucumber salad and shrimp. Serve with soy sauce and wasabi.

image_1